Before we start with the real fun stuff, let's spend a chapter or some minutes to understand the basic principles behind defining and using properties in Qlik Sense Visualization Extensions.
This chapter only focuses on the basic concept of properties, a detailed overview of all possibilities will be added later on in one of the advanced chapters.
The Idea Behind Properties
The main idea behind properties is to offer users a way to customize the behavior of visualization extensions in the same way as they would control Qlik Sense' native objects. Therefore an extension developer can use a programmatic interface to define properties which are then displayed in the right property panel the exactly same way as it is the case with native objects.
The property panel
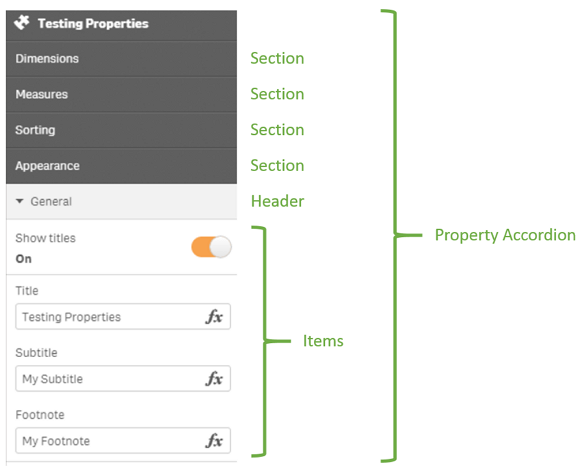
If you have a look at the property panel accordion you'll recognize that properties are structured in a hierarchy as follows:
- Accordion
- Accordion sections
- Section headers
- Property items
- Section headers
- Accordion sections
Property panel definition in your JavaScript file
As already mentioned in the previous chapter, properties can be added by defining them in the definition property of the extension's JavaScript file:
Built-in vs. custom properties
There are two main approaches how you can define properties:
- Re-use existing (built-in) properties
- Create custom properties
Re-use existing properties
If you have spent some time with Qlik Sense, you already know the concept of typical properties used for the most common native objects:
- Every native object has a section called "Appearance" and a section header called "General"
- Most of the native objects allow "Dimensions" and "Measures" to be defined
If you create a visualization extension without specifying any specific properties to be shown in the property panel you'll get the following:
Code:
define( [
        'jquery'
    ],
    function ( $ ) {
        'use strict';

        return {

            paint: function ( $element /*, layout*/ ) {

                $element.empty();
                var $msg = $( document.createElement( 'div' ) );
                $msg.html( 'Just demonstrating default behavior of the property panel"' );
                $element.append( $msg );

            }
        };

    } );
Result:
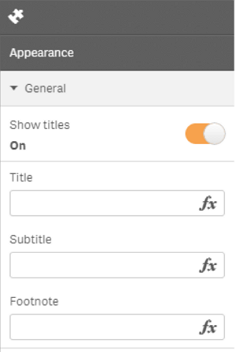
So getting the "Appearance" section is the default behavior.
You'll get the same result by telling Qlik Sense to re-use the section "settings" (which is the internal name for the "Appearance" section.
define( [
        'jquery'
    ],
    function ( $ ) {
        'use strict';

        return {

            definition: {
                type: "items",
                component: "accordion",
                items: {
                    appearance: {
                        uses: "settings"
                    }
                }
            },

            paint: function ( $element /*, layout*/ ) {

                $element.empty();
                var $msg = $( document.createElement( 'div' ) );
                $msg.html( 'Just demonstrating default behavior of the property panel"' );
                $element.append( $msg );

            }
        };

    } );
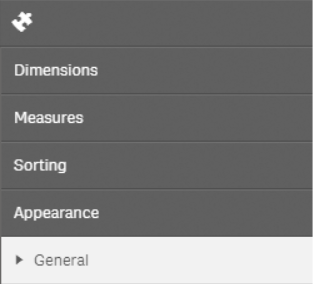
Based on this example we can now extend definition to re-use other built-in sections.
Code:
// --
// Reuse the following sections
//  - dimensions
//  - measures
//  - sorting
//  - settings ("Appearance" section)
// --
definition: {
    type: "items",
    component: "accordion",
    items: {
        dimensions: {
            uses: "dimensions"
        },
        measures: {
            uses: "measures"
        },
        sorting: {
            uses: "sorting"
        },
        appearance: {
            uses: "settings"
        }
    }
}
Result:
Referencing properties
As we have now defined some properties to use in our extension, let's have a look how to reference the properties in our code.
We haven't covered this so far: A second parameter called layout will be passed to the paint method, which includes the current scope the extension object, also "holding" the properties we have defined.
// Make sure to add some dimensions and measures to your extension first
// (This will give you a better picture what layout can contain ...)
paint: function ( $element, layout ) {

    console.info('paint >> layout >> ', layout);

}
If you have a look at the console output of e.g. Chrome's Dev Tools, you can easily find what you are looking for:
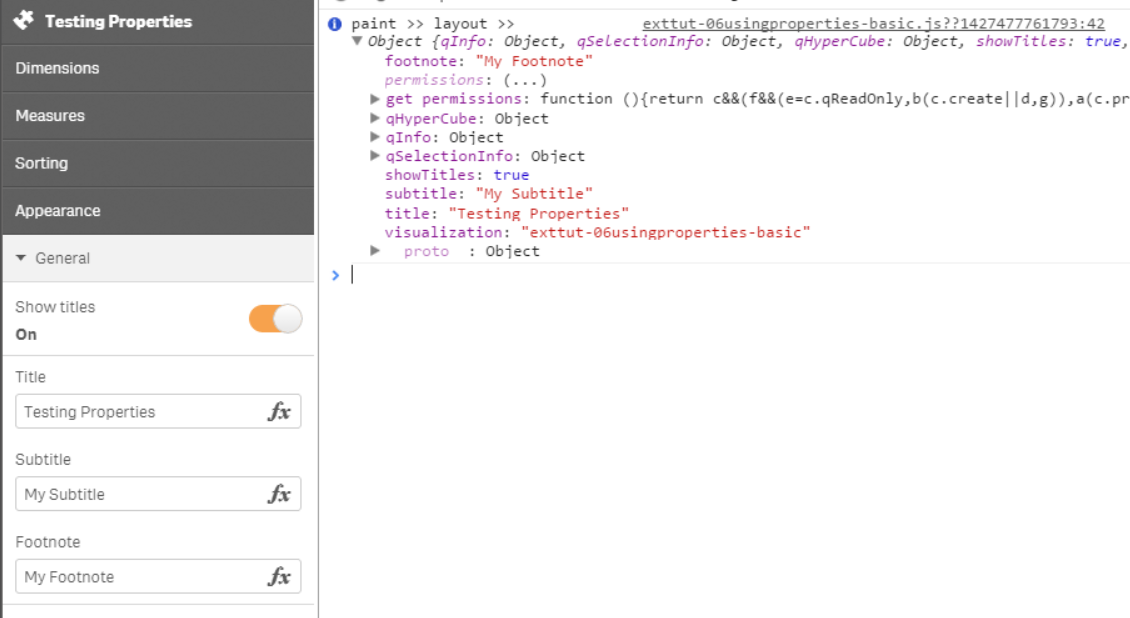
So let's output some values in our paint method:
paint: function ( $element, layout ) {

    // Output values from the property panel
    $element.empty();

    // Our output container
    var $msg = $( document.createElement( 'div' ) );

    // Variable holding the output
    var html = '<b>Property values:</b><br/>';
    html += 'Title: ' + layout.title + '<br/>';
    html += 'SubTitle: ' + layout.subtitle + '<br/>';

    // Assigning the variable to our output container
    $msg.html( html );

    // Adding the output container to the current element
    $element.append( $msg );

}
Great, you now can use built-in properties in your visualization extension in the next chapter we'll explore how to customize the property panel to get our very custom properties into there to allow users to configure the behavior of your visualization extension.