Objective
Let's create a 'Hello World' component, including some of the basic concepts of the Custom Component API.
Let's get Started
As a start we use the boilerplate and modify the name and the default output.
The prefix for the component is again ccs (which stands for custom component sample), just to prevent conflicts with any further components.
The ccs-hello-world.qext file:
{
  "name": "ccs-hello-world",
  "description": "The very exciting Hello World component.",
  "type": "component",
  "version": "0.1.0",
  "author": "Stefan Walther"
}
The ccs-hello-world.js file:
define( [], function () {
    'use strict';

    return {
        name: "ccsHelloWorld",
        restrict: 'E',
        link: function ( scope, element, attrs ) {
            element.html( 'Hello world.' );
        }
    };
} );
Using ccs-hello-world:
After having imported ccs-hello-world we can use it in the Widget editor:

Not really exciting, but let's review some of the basic concepts of this very simple example:
- As mentioned above we return the signature of an AngularJS directive in our Custom Component.
- The property
namedefines the name of the component, using the camelCase concept. - The property
restrictwith the valueEdeclares that we can use the component straight aways like a native Html element. (Other options are possible, read here ). - The
linkfunction provides low level access to manipulate the DOM:- This, it provides access to the following objects
scope- The AngularJS scope.element- The jqLite-wrapped element that this directive matches.attrs- A hash object with key-value pairs of normalized attribute names and their corresponding attribute values.
- This, it provides access to the following objects
- As the function
linkprovides access to theelementand therefore andhtmlmethod , we are manipulating the HTML content of the current component with `element.html( 'Hello world.' );
OK, all fine, but not really useful in the context of the Widget concept.
Let's go one step further and allow the Widget creator to customize the "Hello-World" message.
Customize the Hello-World Message
Following the power of AngularJS' directives there are several ways to achieve the same result. This example just shows one of the possible solutions. But this example is following some best practices when working with Custom Components & Widgets.
Objective
We'd like the user to allow defining the message within a Widget:
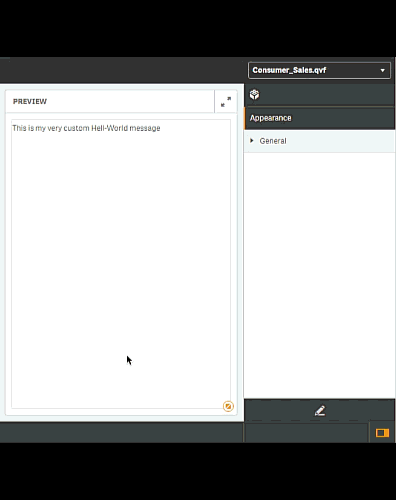
<ccs-hello-world message="This is my very custom Hello-World message." />
which should result into:

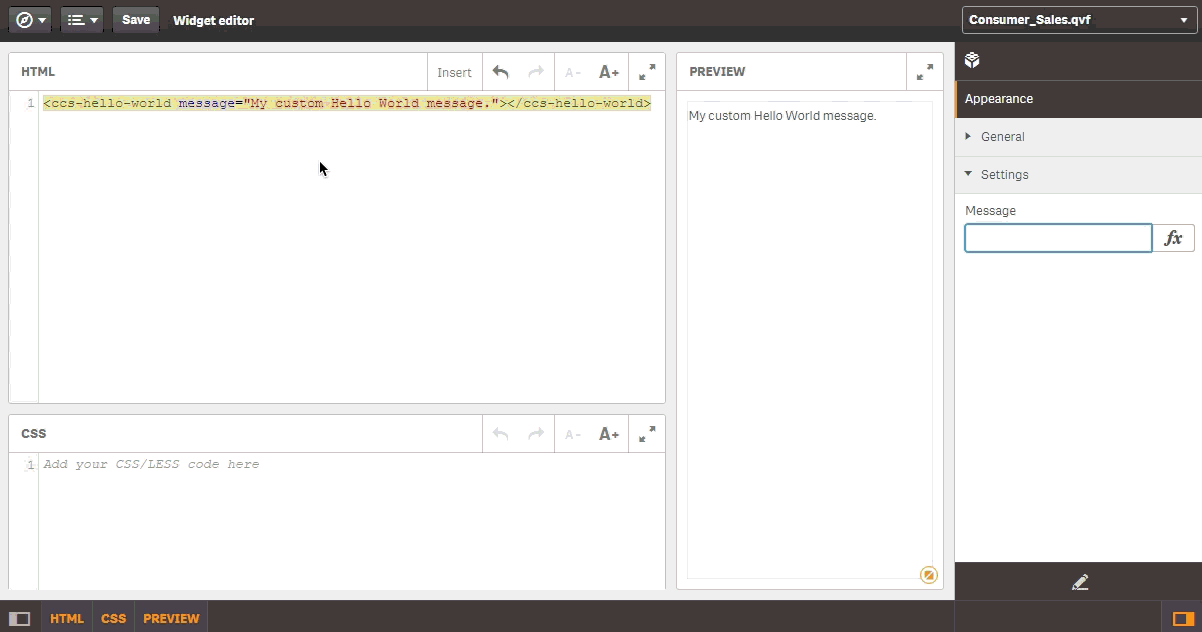
To achieve the desired result, let's add an one-way binded attribute message to the scope of our component:
    var component = {
        name: "ccsHelloWorld",
        restrict: 'E',
        scope: {
            message: '@'
        },
        link: function ( scope, element, attrs ) {

            // Now let's see what we have in our scope
            console.log( 'Custom message: ', scope.message );

        }
    };
For newbies in AngularJS just these few lines introduced quite a lot of new concepts, let's have a look at them one by one:
The scope:
The scope is one of the core concepts of AngularJS. The scope is the connecting piece between your HTML and your JavaScript based component.
Think of the scope as a container of objects (with properties and values). These objects are used for data-binding, so bringing your HTML pieces together with what you have defined in your component.
One way binding:
The binding of scope properties in AngularJS is very powerful, but can also be pretty complicated.
Think of the "one-way-binding" for now as follows:
- We'd like to define the properties in a Widget
- We'd like to use the values of the properties in a Custom Component
- We want to prevent that property values are propagated to outside the boundaries of a Custom Component (e.g. the entire Qlik Sense client)
Just forget it, for now:
Don't let yourself get confused by these new concepts, for now we could just simplify our changes to:
- We have defined a property called
messagein our component. - This property called
messagecan be set in a Widget using the attributemessage. - We are then fine to use this property within our component using
scope.message.
Considering this simplification let's change the component as follows:
    var component = {
        name: "ccsHelloWorld",
        restrict: 'E',
        scope: {
            message: '@'
        },
        link: function ( scope, element, attrs ) {

            element.html( scope.message );

        }
    };
Which would result into:
Creating a Fully Customizable Widget
As the main and only usage scenario for a Custom Component is (right now, as of Qlik Sense 3.1) to empower Widget creators, we should think of making the Widget using our component as generic as possible.
Using ccs-hello-world in the Widget editor and changing the property message is nice, but it doesn't make our Widget generic.
So let's transfer all the power to the Widget creator and let's create a fully customizable Widget using the new component ccs-hello-world:
First let's create a property named settings.message using the Property Panel Builder:
The next step would be to bind the newly property settings.message in the Widget editor to the ccs-hello-world component:
Which results into:
<ccs-hello-world message=""></ccs-hello-world>
If you were following the steps above, you have probably realized that we are still missing one piece:
- If you are changing the value of the property
messagemanually, then the Widget will be re-painted after every change. - Although, if you are changing some values of referenced values of the Property Panel, the Custom Component will not be updated.
To know inside a Custom Component that a referenced value (in our cases an interpolated value) has been changed, we have to watch the changes
inside the Custom Component using AngularJS' watch concept :
Let's re-write the link method as follows:
    link: function ( scope, element, attrs ) {

        function bind () {
            element.html( scope.message );
        }

        // Execute bind() initially ...
        bind();

        scope.$watch( 'message', function ( newVal, oldVal ) {

            console.log('watch', newVal, oldVal);

            // Bind if there are changes ...
            if (newVal !== oldVal) {
                bind();
            }

        } );
    }
Now you can use a Custom Component in a Widget, expose its settings by custom properties using the Property Panel, so the "end-user" can fully customize your Widget.